Would you like to transform your porch into an outdoor living space? Are you trying to find a way to use your porch all year round, even when the weather gets cold? Would you prefer to find an affordable DIY option for this rather than pay a fortune to get someone else to do it?
Before I figured out how to enclose a porch for winter, mine was filled with sand during the summer and snow during the winter. I could only ever really use my porch when the weather was perfect, with no wind or rain.
Since I really wanted to learn how to get more use out of my porch, I set out looking for the best porch enclosure ideas. I found a few easy ways to enclose your porch and protect it from inclement weather and I want to share these ideas with you today! Keep reading to learn more.

Looking For Help From a Professional Company?
If you’re looking for someone to help you with enclosing your porch, you can get a free quote from top local contractors here:
Contents
Installing A Patio Enclosure 101
What You Will Need To Follow This Tutorial
- Generic waterproof patio enclosure
- A staple gun
- A Phillips screwdriver
- Tape measure
- Level
- Pencil
- Outdoor paint (optional)
- Trim
- Stepladder or step stool
Stepladder Vs Step Stool
Very few understand the difference between a stepladder and a step stool. Put simply, a stepladder is a type of ladder with a self-supporting mechanism and it is shaped like an inverted V.
On the other hand, a step stool looks more like a stool than a ladder. It’s basically a series of steps that leads to a flat platform.
If you’re carrying out an outdoor project such as this one, I recommend using a stepladder. It’s heavy-duty and sports a rugged design that makes it fit for the outdoors.
For indoor renovations, a lightweight step stool is a better option. If you don’t have a stepladder, a step stool will still work.
Steps
Here is the step-by-step guide on how to install a patio enclosure:
- Inspection And Measurement
Before you start your enclosure project, it’s a good idea to have your local building inspector go through your plan. Perhaps there are special requirements for how you should enclose a porch such as this and this might require a building permit and inspection.
Even if it’s not mandatory to have your porch inspected prior to building, it’s a worthwhile investment. It will give you peace of mind knowing that your DIY project doesn’t break any laws.
Besides, the local inspector might spot problems that need to be fixed on your porch before building the enclosure.
After the inspection, the next step is to take measurements. To be specific, you’ll want to determine the size of the open sides of your porch, so you can buy an enclosure that will fit in that specific space. Measure both the width and height of the open side or sides of your porch.
For this project, I chose the Generic Waterproof Patio Enclosure – a sturdy and waterproof enclosure that measures 8 by 10 feet. This is the perfect size for my porch. But, if you have a bigger or smaller porch opening, the enclosure is available in many other sizes.
- Build And Install The Frames
If your porch doesn’t have them already, consider installing a couple of frames to hold the enclosure in place. This is not difficult and it only requires basic measuring and woodworking skills.
Using the measurements you obtained in step 1, divide the length by the number of enclosure sections you want to have. Keep in mind that you don’t want to end up with overly big screen frames. Ideally, they shouldn’t be wider than those for a standard screen door.
Next, make simple wooden frames from 2x4s. These will be installed between the base of your porch and its roof.
One tip is to use wood screws as opposed to nails when attaching the frame to the roof. These form a stronger connection and enhance the stability of the enclosure. - Treat The Wood
If you’re using untreated wood to make the frames, it’s a good idea to treat it. This means painting or staining the wood and it should be done before you install the patio enclosure.
Start with a good primer, then follow it up with two coats of high-quality outdoor paint. If you opt for staining instead, you can use a paint sprayer to help you stain uniformly across the wood. Remember to cover the floor of your porch with newspapers or tarps to avoid drips and stains. - Install The Patio Enclosure
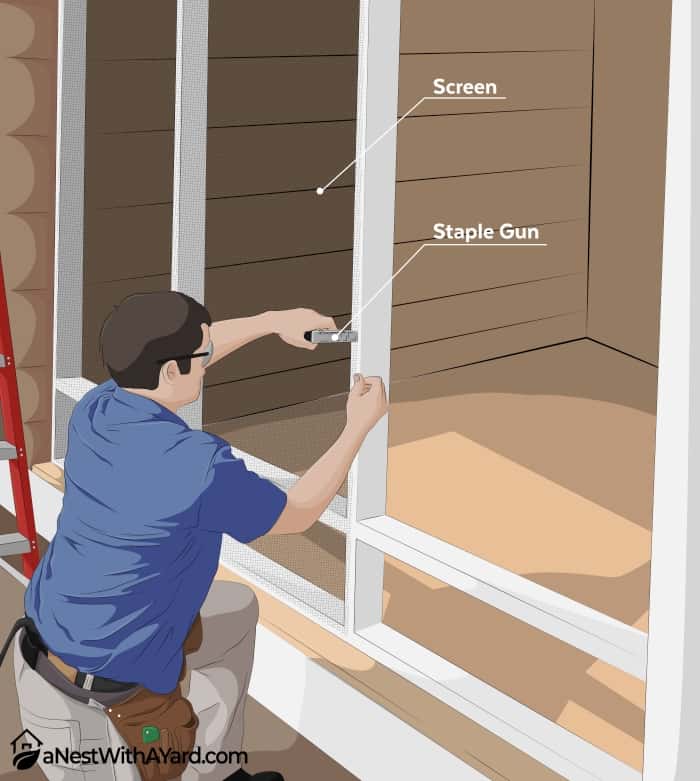
Given that you measured the wooden frames to size, the Generic Patio Enclosure should fit perfectly when you lay it over the opening. All you’ll need to do is pull the enclosure panels tightly between the frames and secure them in place by stapling.


Alternative Patio Enclosure Option: Using Plastic Sheets
If you don’t like the Generic Patio Enclosure I mentioned above, you can also try enclosing your porch with plastic sheets. This is a fairly cheap alternative. Here’s what you should do:
What You Will Need
- Tape measure
- Step ladder
- Plastic sheet(s)
- Scissors or utility knife
- ½-inch staples
- A staple gun
Steps
Here are the alternative steps using plastic sheets:
1. Measurement
Take measurements of every screen section (the height and width). Then, add 4 inches to these numbers. This will help you to cut the right size of plastic sheet for every section.
Measure and cut the plastic panel or panels to the correct size, depending on how many screen sections you have.
2. Installation
Place the plastic over the opening. Make sure you position the plastic sheet well, both horizontally and vertically, leaving the excess to cover the area beyond the edge of the framing.
Using a staple gun, connect the top left corner to the frame at about ½ an inch from the inside edge. Do the same to the top right corner. Pull the plastic panel tightly, ensuring that no more than 2 inches of the sheet goes beyond the inside edge of the frame.
Move to the base of the plastic sheet and pull the plastic sheeting tightly into place. Start by pulling the left side against the opening, making sure that no more than 2 inches of the sheet goes past the interior edge of the frame.
Again, using your staple gun, staple the lower-left corner. Repeat these steps on the right side of the sheeting.
3. Finishing Touches
If there’s excess plastic on the left side, fold it so that the exterior edge is flush with the interior edge of the frame. Staple the folded section into place. Be sure to add staples to all four edges of the screen.

How To Enclose A Porch For Winter
An outdoor porch enclosure can do a lot for you and your family. In addition to offering protection from all of Mother Nature’s nastiness, it can enhance the curb appeal of your home.
Besides, you don’t need to spend a fortune on learning how to enclose a porch for winter. With the right tools and knowledge, you can undertake any DIY patio makeover project with the help of your friends or family.
If you’re looking to enclose your porch, one of the best things you can invest in is the Generic Waterproof Patio Enclosure I mentioned above. It’s completely waterproof and easy to install.
Did you enjoy my tutorial? If you did, remember to share this post. You can also post any comments, questions, or concerns in the comment box below.
About The Author
Last update on 2024-04-26 at 03:53 / Affiliate links / Images from Amazon Product Advertising API
Nadya, I am so glad I’m not the only woman doing this. I absolutely love your ideas. I had the same ones but, my husband kept telling me ” you can’t do that ” which usually depresses me to the point of going to bed and staying there for several days. I refuse to do that this time. I love hot weather only. I hate being indoors. I actually opened your site because I have been looking for something besides Hardie board to just inclose the bottom half of my back porch, but it cost a small fortune so I do have 2 10×12 colored awnings that are just setting in my garage in there original boxes. I can probably use those for the sides.
So I want to thank you for not making me feel stupid. 🙂
Hey Denise,
Thank so much for your awesome comment! It made my day!
Yes, go for it! You are not stupid at all and you can totally do it!